
Hello everyone. As my first entry in this blog, I would like to start writing about a topic that is very easy to implement and that was one of the most requested news by the entire Prestashop community for its latest version: how to install a child theme in Prestashop 1.7 .
Until version 1.6 the configuration of the template was somewhat tedious: you could create a clone, but even so having to make modifications on the subject seemed a bit heavy. With the last major update of Prestashop, with this type of inherited themes, we are allowed to make modifications to it, without affecting the structure of the main theme.
Child themes are by no means a novelty in the web design landscape: it has been implemented in WordPress for quite some time and, at the end of last year, it arrived at Prestashop.

Advantages of using child themes
Among the most significant we find:
- All the modifications that we make to the child will not affect the parent, in this way we will not modify the main structure.
- Then there is the opposite case: any update of the parent theme will not affect the modifications made on the child theme. The relevant improvements will be made to the core without reducing an iota of the changes made to the child. This will not affect our customization.
How to implement the child theme in Prestashop 1.7
It is a very simple task and you will see how in a few steps you will have your child theme ready and configured. As Prestashop comes with a default theme called classic, we will use that for our tests.
Steps to create a child theme:
- Create a new directory within the themes directory of your online store, call it whatever you want, I recommend that it have the word child somewhere. In this way we can easily locate it.
- The first minimum file required for the new child theme to run is: the image file preview.png . Ideally, you should take a screenshot when its appearance is changed so that you will have a preview image of the child theme similar to what you see on the screen. It is not logical to copy and paste the preview of the parent and keep the design of it.
- You will need a config folder, because within this it is necessary that we have the theme.yml file. So you go to the parent theme, copy the config directory and paste it into your child theme. The grace of all this is knowing how to adapt that file.
This file (I am going to show you an image of the file that we have copied from the father) you will see that it has a series of fields
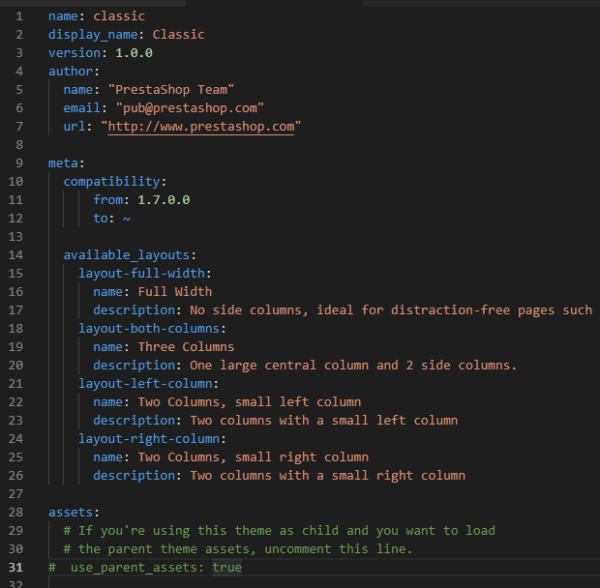
I’m only going to show you part of its structure, the basic one, which is enough to start working with your child theme.
-The name that your theme will have , as well as the name that will appear on the back. Its version management, as well as the author’s data.
-The meta compatibility: the compatibility between themes . You already know that those of 1.6 are not compatible with 1.7 and vice versa.
-Then we have the layouts available for this theme that are inherited from the father.
-We continue with an assets section , and the one that interests us the most in this file, the use_parent_assets. This tells us if we want to use the original assets that come from the parent. Highly recommended because it sure brings custom styles, its own javascripts, etc … Another thing, if you call it the same as the parent file (that is, classic theme has custom.css and you create the same file in the child theme, respecting the same structure of directories of the same) Prestashop will interpret that it has to use that of the child . It will interpret that we are trying to overwrite the behavior of that file.
- Once we are clear about the structure of this file, the first thing we will do is go to assets and uncomment the use_parent_assets line.
- Then, we will include a line (usually the first one) that is parent: name_of_the_parent_theme (name of the directory that you are going to use as parent). If you want you can modify the author, and the display_name which is what will appear in the backoffice.
And here, I leave you a screenshot of the modified theme.yml in an example child theme so you can see how it looks.
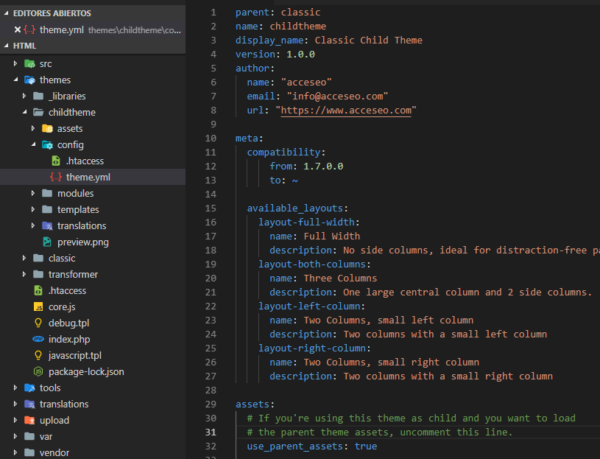
Notice that there is a .htaccess file in the directory where the theme.yml is, take the one from the parent theme. It is used to protect the directory using a series of Apache directives (2.2 and 2.4).
- Once you have everything ready, you can go to the Prestashop backoffice again and go through the themes section . You will notice that under the classic theme that is the default selected in Prestashop, a new element will appear at the bottom that is the Child Theme that you have just created .
- Click on the option that tells you that you are going to use that theme . From that moment on, you will be using the resources that you insert and configure in the child theme.
>> I would recommend first an emptying of the Prestashop cache, then create a couple of directories and subdirectories to test that everything works correctly.
- Inside the child theme create a directory called assets , and inside this another one called css. Enter this css and create the file custom.css, or copy and paste the one in the parent directory. If the “cache” folder is not automatically created within the assets directory that you have created, create it too.
>> Put whatever you want inside, for example, add a background color to the body.
- Refresh your page (or empty the cache again if nothing happens) and you will see that now, inspecting the source code, apart from taking the files it needs from the parent theme, it has collected a file from your child theme: / themes / childtheme / assets /css/custom.css
In this way we have the beginning of a child theme, and we can now implement modifications within the child of tpl, css, javascript files … whatever is necessary.
I hope this mini tutorial has been to your liking and you have managed to implement the child theme on your website. Until next time!